Elasticsearch 작업을 위해서 원천데이터인 RDBMS(mysql) 데이터를
elasticsearch 로 최종 반영을 하기 위해 두번의 단계를 거쳐서 ES Document 형태로
가공하는 샘플을 Logstash 에서 작업하는 과정을 정리 하겠습니다.
1단계 (Rdbms To Redis)
INPUT(Mysql) -> OUTPUT(Redis)
Input 에서는 RDBMS로 누적되어있는 관계형 데이터베이스 mysql 정보를
In Memory Cache Redis에 적제되는 과정
sampleInsert.sql 파일 생성후 아래 Select 조회
SELECT
    no, type, regdate
FROM
    deal
WHERE
    type = 'LIVE'
        AND regdate >= '2020-01-01'
        AND regdate < '2020-04-24'
ORDER BY regdate
LIMIT 1000
Redis (output) 들어가는 JSON형태
{
	"regdate": "2019-12-31T15:00:01.000Z",
	"@version": "1",
	"@timestamp": "2020-07-14T01:28:02.405Z",
	"type": "LIVE",
    "index_key": "2901825198",
	"index_target": "deal",
    "index_create_seq": "2020",
	"no": 9483920342
}
redisinsert.conf
input {
  jdbc {
    jdbc_driver_library => "/Users/renzo/espack/logstash-6.5.4/config/jdbc/mysql-connector-java-5.1.46-bin.jar"
    jdbc_driver_class => "com.mysql.jdbc.Driver"
    jdbc_connection_string => "jdbc:mysql://localhost:3306/store?characterEncoding=UTF-8&zeroDateTimeBehavior=convertToNull&useAffectedRows=true&sessionVariables=group_concat_max_len=204800"
    connection_retry_attempts => 1000
    connection_retry_attempts_wait_time => 5
    jdbc_user => "store"
    jdbc_password => "store123"
    jdbc_default_timezone => "Asia/Seoul"

    use_column_value => true
    tracking_column => "regdate"
    tracking_column_type => "timestamp"
    #clean_run => true

    schedule => "* * * * *"
    statement_filepath => "/Users/renzo/espack/logstash-6.5.4/config/sampleInsert.sql"
  }
  stdin{}
}

filter {
  mutate {
    add_field => {
      "index_target" => "deal"
      "index_key" => "%{no}"
    }
  }

  ruby {
    code => "event.set('index_create_seq', Time.at(event.get('created_at').to_i).strftime('%Y'))"
  }
}

output {
  redis {
    host => "127.0.0.1"
    port => "6379"
    data_type => "list"
    key => "deal"
  }
  stdout {
    codec => rubydebug
  }
}
filter 에서 해주는 역활은 ES에 최종 만들어지는 document 에서 기준이 되는 index에 정보를 만들기 위한 메타정보 입니다.
pipelines.yml 파일 추가
- pipeline.id: redisinsert
  queue.type: persisted
  path.config: "/Users/renzo/espack/logstash-6.5.4/config/conf.d/redisinsert.conf"
Logstash 폴더 하위에 있는 config에 redisinsert.conf 를 생성하고 pipelines.yml에 작업한 conf파일을 추가한뒤
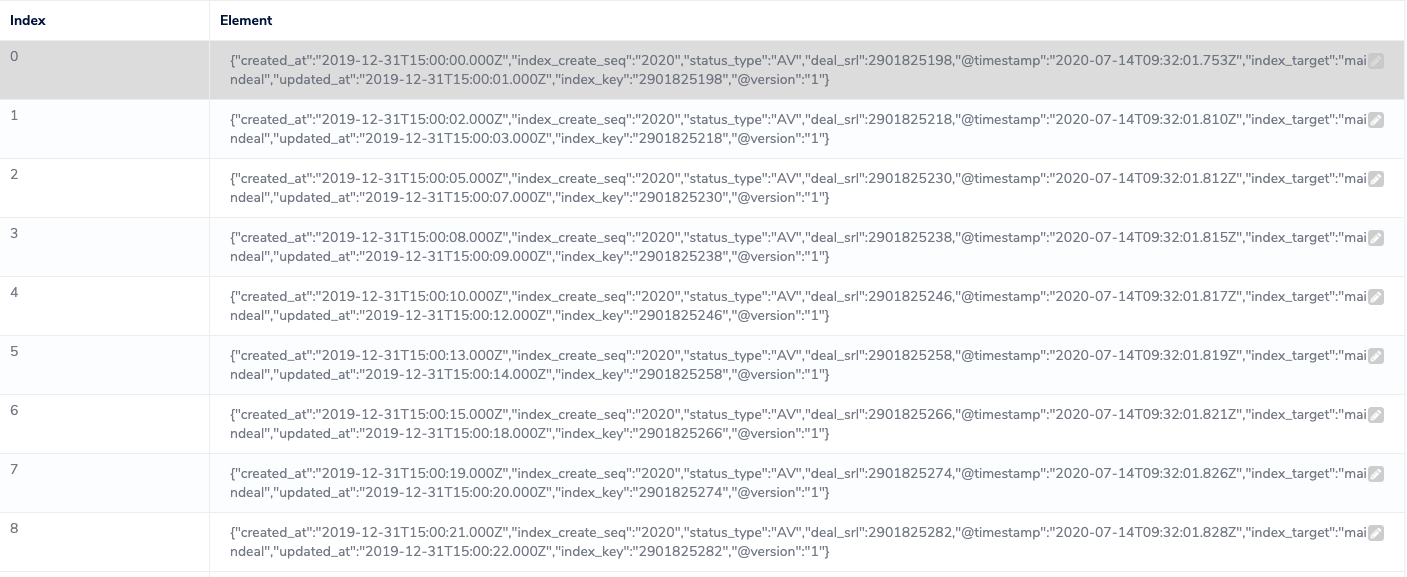
Logstash 를 재기동 하면 pipelines에 정의된 redisinsert 가 실행 되면서 redis에 적재된 자료구조 형태를 확인할수 있다.
Redis 관리자 UI에서 직접 등록된 cache 데이터 확인 가능

Logstash 에 등록된 conf 가 정상적으로 등록되면
아래 경로에 logstash 에서 진행된 Queue 정보를 확인할수 있으며
pipeline.yml 소스레벨에서 pipeline.id 로 생성된 폴더가 생성됨
/Users/renzo/espack/logstash-6.5.4/data/queue
drwxr-xr-x  6 renzo  staff  192  7 15 12:05 redisinsert
drwxr-xr-x  6 renzo  staff  192  7 14 18:34 sampleRedisToElasticsearch

하위 폴더 접근 하면 아래 파일 확인 가능
$ cd redisinsert
-rw-r--r--  1 renzo  staff         0  7 10 12:18 .lock
-rw-r--r--  1 renzo  staff         4  7 10 12:18 .queue-version
-rw-r--r--  1 renzo  staff        34  7 15 12:05 checkpoint.head
-rw-r--r--  1 renzo  staff  67108864  7 15 12:05 page.8
2단계 (Redis To Elasticsearch)
Redis 에 적재된 JSON 형태 List Object 를 ES로 Push 하기 위해서는 우선 index 생성이 필수적으로 필요하다.

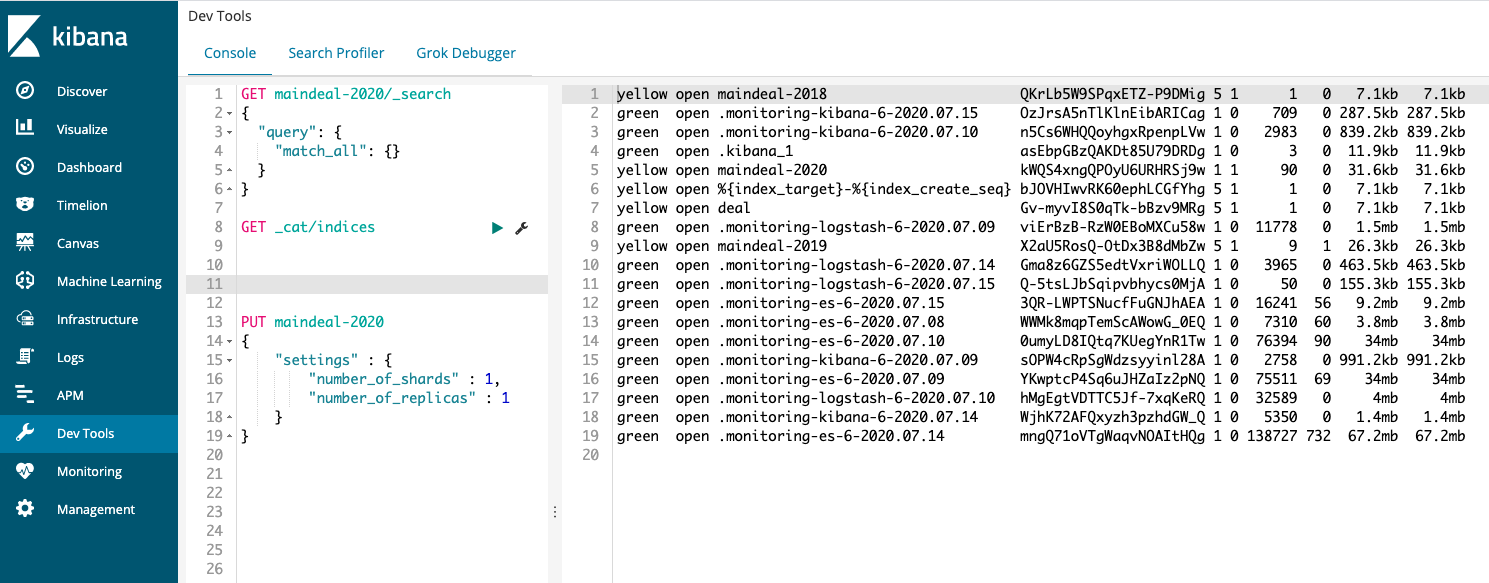
우선 Elasticsearch 에서 생성되어있는 index 목록을 확인할수 있다.
Kibana 모니터링 UI Tool 로 접근한뒤 아래 소스 명령어 실행
GET _cat/indicesES에서 관리하기위한 index 생성 방법
number_of_shards : 권고하는 생성방법은 인스턴스 한대 Node한대고 구성하고 Node 갯수만큼 shards 를 생성함
number_of_replicas : 주샤드를 복제할 리플리카 갯수 설정이며 검색에 최적화하려면 replicas 를 늘리면됩니다. 색인용도로 사용하는 index라면 1개정도 백업으로 사용하셔도 무방합니다.
PUT maindeal-2020
{
    "settings" : {
        "number_of_shards" : 1,
        "number_of_replicas" : 1
    }
}
실행 시 결과물은 아래처럼 Response 됩니다.
아래처럼 true Response과 나오면 정상적으로 생성된 index 확인이 가능합니다.
{
  "acknowledged" : true,
  "shards_acknowledged" : true,
  "index" : "maindeal-2021"
}
생성된 ES Index Search 조회
GET maindeal-2021/_search
{
  "query": {
    "match_all": {}
  }
}


조회된 결과물
현재 등록된 document가 없기때문에 hits 에 결과물은 0 입니다.

{
  "took" : 0,
  "timed_out" : false,
  "_shards" : {
    "total" : 1,
    "successful" : 1,
    "skipped" : 0,
    "failed" : 0
  },
  "hits" : {
    "total" : 0,
    "max_score" : null,
    "hits" : [ ]
  }
}| RDBMS | Elasticsearch | 비고 |
| database, table | index, type | 일반 RDB는 하나의 database 내에 여러개의 table을 가질수 있으나, ES에서는 index당 하나의 type만 가질수 있습니다. ES7 에서 일부 명령어에 type 부분을 생략하는게 디폴트로 되어있습니다. |
| row | document | |
| column | field | |
| schema | mapping | name : varchar age : int64 위와 같이 각 필드별 데이터 타입 지정을 매핑이라고 합니다. ES는 스키마 세팅없이 데이터를 insert하면 해당데이터를 체크해서 자동으로 스키마가 생성되지만 100프로 정확하지 않기때문에 수동으로 매핑 하는것을 권장 합니다. |
ES Index 생성후
_mapping 을 필수적으로 생성하는것을 권고합니다.
INPUT(Redis) -> OUTPUT(Elasticsearch)
conf.d 폴더 하위에 파일 생성
파일명 : redisToEs.conf
input {
  redis {
    host => "127.0.0.1"
    port => "6379"
    data_type => "list"
    key => "deal"
    #batch_count => 1
    threads => 4
  }
}

filter {
  jdbc_streaming {
    jdbc_driver_library => "/Users/renzo/espack/logstash-6.5.4/config/jdbc/mysql-connector-java-5.1.46-bin.jar"
    jdbc_driver_class => "com.mysql.jdbc.Driver"
    use_cache => "false"
    jdbc_connection_string => "jdbc:mysql://localhost:3306/store?characterEncoding=UTF-8&zeroDateTimeBehavior=convertToNull&sessionVariables=group_concat_max_len=204800&autoReconnect=true"
    jdbc_user => "store"
    jdbc_password => "store123"
    statement => "
      SELECT title
      FROM goods
      WHERE no = :no
    "
    parameters => { "no" => "no" }
    target => "sqldata"
  }

  ruby { code => "
    event.get('[sqldata][0]').each {|k,v| event.set(k,v) }
    event.remove('sqldata')
    "
  }

  mutate {
    add_field => { "[@metadata][index_target]" => "%{index_target}" }
    add_field => { "[@metadata][index_create_seq]" => "%{index_create_seq}" }
    add_field => { "[@metadata][index_key]" => "%{index_key}" }
    remove_field => [ "index_target" ]
    remove_field => [ "index_create_seq" ]
    remove_field => [ "index_key" ]
  }
}

output {
  elasticsearch {
    hosts => "127.0.0.1:9200"
    index => "%{[@metadata][index_target]}-%{[@metadata][index_create_seq]}"
    document_id => "%{[@metadata][index_key]}"
    doc_as_upsert => true
    action => "update"
  }
  stdout {
    codec => rubydebug
  }
}
pipeline.yml 수정
- pipeline.id: redisToEs
  queue.type: persisted
  path.config: "/Users/renzo/espack/logstash-6.5.4/config/conf.d/redisToEs.conf"
logstash 재시작
/Users/renzo/espack/logstash-6.5.4/bin/logstash정상적으로 처리 완료되면 Elasticsearch 에서 만들어둔 index에 적재된 Document문서 확인가능
GET maindeal-2020/_search
{
  "query": {
    "match_all": {}
  }
}

Response 결과

{
  "took" : 0,
  "timed_out" : false,
  "_shards" : {
    "total" : 1,
    "successful" : 1,
    "skipped" : 0,
    "failed" : 0
  },
  "hits" : {
    "total" : 90,
    "max_score" : 1.0,
    "hits" : [
      {
        "_index" : "deal-2020",
        "_type" : "doc",
        "_id" : "2901825198",
        "_score" : 1.0,
        "_source" : {
          "@timestamp" : "2020-07-15T03:05:02.073Z",
          "no" : 2901825198,
          "created_at" : "2019-12-31T15:00:00.000Z",
          "status_type" : "AV",
          "updated_at" : "2019-12-31T15:00:01.000Z",
          "@version" : "1",
          "title" : "상품AA"
        }
      },
      {
        "_index" : "deal-2020",
        "_type" : "doc",
        "_id" : "2901825218",
        "_score" : 1.0,
        "_source" : {
          "@timestamp" : "2020-07-15T03:05:02.133Z",
          "no" : 2901825218,
          "created_at" : "2019-12-31T15:00:02.000Z",
          "status_type" : "AV",
          "updated_at" : "2019-12-31T15:00:03.000Z",
          "@version" : "1",
          "title" : "상품BB"
        }
      },
      ..
      ..중략
      ..
      ..
      ,
      {
        "_index" : "deal-2020",
        "_type" : "doc",
        "_id" : "2901825294",
        "_score" : 1.0,
        "_source" : {
          "@timestamp" : "2020-07-15T03:05:02.151Z",
          "no" : 2901825294,
          "created_at" : "2019-12-31T15:00:23.000Z",
          "status_type" : "AV",
          "updated_at" : "2019-12-31T15:00:23.000Z",
          "@version" : "1",
          "title" : "상품CC"
        }
      }
    ]
  }
}


